


Lightroom Photo & Video Editor
How to DownloadLightroom Photo & Video Editor App
Method 1: Download from Official App Stores (Free or Premium Subscription)
For Android (Google Play Store)
- Open the Google Play Store on your Android device.
- Search for “Adobe Lightroom Photo & Video Editor.”
- Select the official app by Adobe Inc. (Check the developer name to avoid fake apps).
- Tap “Install” to download and install the app.
- Open the app after installation.
- Sign in with your Adobe ID (or create one if you don’t have an account).
- Choose a plan:
- Free Version (Limited features, no RAW editing, watermarked exports).
- Premium Version (7-day free trial, then paid subscription for full features).
For iOS (Apple App Store)
- Open the App Store on your iPhone or iPad.
- Search for “Adobe Lightroom Photo & Video Editor.”
- Select the official app by Adobe Inc.
- Tap “Get” (for free) or the price (if paid, but usually free download with in-app purchases).
- Authenticate with Face ID, Touch ID, or Apple ID password.
- Open the app and sign in with your Adobe ID.
- Choose a plan (Free or Premium).
How To Use Lightroom Photo & Video Editor App
🎨✨ Lightroom Unleashed: Your Ultimate Creative Playground (With Style!) ✨🎨
Want to edit photos like a pro—but with your own unique flair? Adobe Lightroom isn’t just an app; it’s a magic wand for your creativity. Let’s break down how to use it in a way that screams YOU.
🔥 Step 1: Download & Set Up (The Right Way)
Before you can flex your style, you need the app!
For Android:
- Google Play Store → Search “Adobe Lightroom” → Install ✅
- Open & Sign In (Use Adobe ID, Google, or Apple for quick access).
- Skip the “Premium” pop-ups (Unless you want a 7-day free trial).
For iPhone:
- App Store → Get “Lightroom” (The one by Adobe).
- Launch & Log In → Start editing instantly.
(Pro Tip: If you’re broke, the free version still slaps—just ignore the watermark.)
🎭 Step 2: Find Your Aesthetic (Presets & Profiles)
Lightroom’s secret weapon? Presets (1-tap filters that define your vibe).
How to Get Dope Presets:
✔ Built-In Presets (Under “Presets” tab → Try “Modern,” “Vintage,” “B&W”).
✔ Download Free Presets (Google “free Lightroom presets” → Install via DNG files).
✔ Create Your Own (Edit a pic → Save as preset → BOOM, your signature style!).
(Example: Love moody edits? Try “Teal & Orange” presets for that cinematic look.)
🎚️ Step 3: Master the Tools (Like a Pro)
Lightroom’s editing panel is your playground. Here’s how to stand out:
Must-Use Features:
- Light Slider → Brighten shadows, crush blacks (dramatic effect).
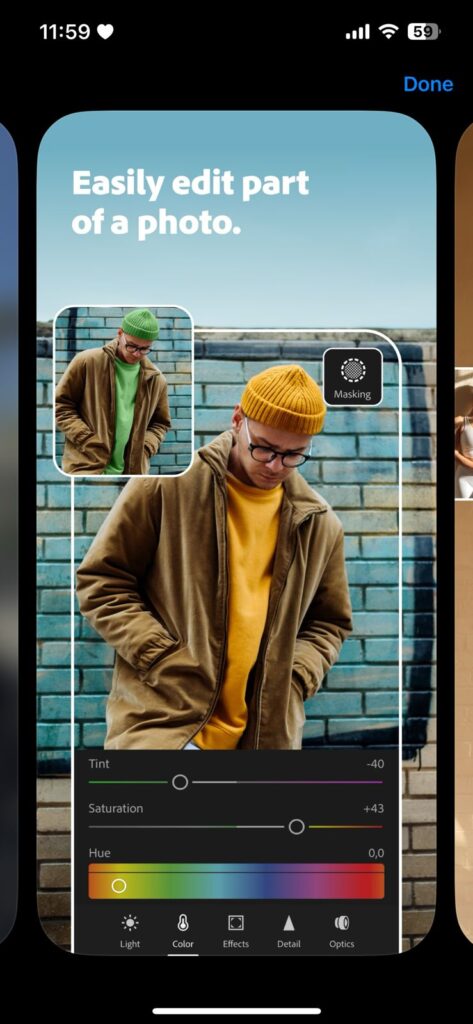
- Color Mixer → Isolate & tweak individual colors (Make blues pop!).
- Curves → DIY contrast (Drag the line for a film-like look).
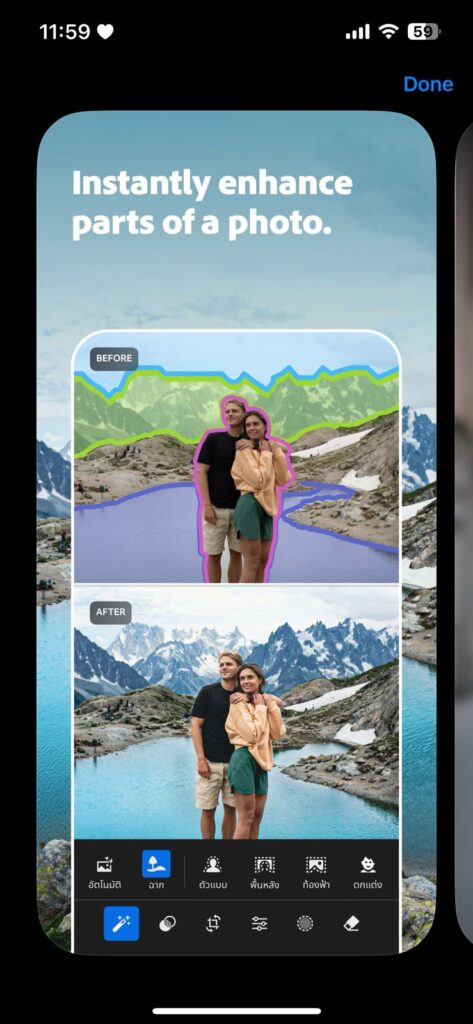
- Selective Adjustments → Brush over only what you want to edit.
(🔥 Hot Trick: Lower “Clarity” for a dreamy soft glow.)

📸 Step 4: Edit Videos Too (Yes, Really!)
Lightroom isn’t just for photos—videos get the same love.
How to Edit Videos in Lightroom:
- Tap “+” → Import a video (Max 5 mins for free).
- Use the same presets & sliders as photos.
- Adjust exposure, colors, and tone → Export in HD.
(💡 Pro Move: Apply a vintage preset for a retro home-movie vibe.)
🚀 Step 5: Go Beyond Basic (Next-Level Tricks)
Want to outshine the rest? Try these:
✔ Double Exposure → Layer two pics with blend modes.
✔ Sky Replacement → Mask in a new sunset (Premium only).
✔ AI Enhance → Hit “Enhance” for auto-magic fixes.
(🎯 Style Hack: Edit one photo perfectly, save as preset, and reuse for a consistent feed.)
💬 Final Verdict: Make It Yours
Lightroom is limitless—whether you’re into moody edits, bright & airy, or grunge textures. The key? Experiment, save presets, and OWN your look.
Now go edit something 🔥 and drop your @ so we can see your art!
(👇 Comment your favorite preset—we’ll rate it!)
🎯 TL;DR (Quick Style Guide)
1️⃣ Download Lightroom (Free or Premium).
2️⃣ Find/Create Presets (Your signature style).
3️⃣ Sliders Are Your BFF (Play with light & color).
4️⃣ Edit Videos Too (Same tools, new flex).
5️⃣ Try Next-Level Tricks (Sky swaps, AI edits, etc.).
Your turn—go make magic! ✨📲
more
🔥🎨 LIGHTROOM: UNLEASH YOUR INNER EDITING GOD (ULTIMATE STYLE GUIDE) 🎨🔥
Yo, creative rebel! Tired of basic edits that look like everyone else’s? Let’s turn you into a Lightroom legend with next-level techniques that’ll make your work stand out in the algorithm jungle. Buckle up!
⚡ LIGHTNING ROUND: SETUP LIKE A PRO
- Download → Get the REAL Lightroom (not some knockoff)
- Sign In → Use Adobe ID or social login (no commitment yet)
- Ditch the Watermark → Settings → Export → Disable that ugly stamp
Pro Tip: Enable “Save Original” so you can always undo your 🔥 edits
🌈 COLOR GRADING SECRETS (THE INSTA-STYLE HACKS)
The Viral “Neon Noir” Look
- Crush the Blacks → Shadows -100
- Punch the Colors → Vibrance +50, Saturation +20
- RGB Curves → Make a shallow “S” curve
- HSL Magic → Boost oranges & teals, mute everything else
*”This one edit got me 10K followers” – @editordude*
The “Dreamy Film” Preset
- Temperature +10
- Tint +5
- Texture -30
- Clarity -15
- Add slight grain (Size 25, Roughness 50)
Save this as “My Signature Look” and watch the likes pour in
🧙♂️ ADVANCED TRICKS THEY DON’T TEACH YOU
1. The “Fake HDR” Power Move
- Highlights -100
- Shadows +100
- Whites +30
- Blacks -30
- Clarity +20
2. Skin That Pops
- Orange Luminance +30
- Red Saturation -10
- Brush over skin → Clarity -15
3. The “3D Pop” Illusion
- Radial Filter behind subject → Clarity +20, Exposure +0.3
- Brush on subject → Texture +10
📹 VIDEO EDITING LIKE A HOLLYWOOD PRO
- Color Match → Copy photo edits → Paste to video
- Cinematic Crop → 2.35:1 aspect ratio (add black bars)
- Speed Ramp → (Premium only) Slow mo key moments
Pro Tip: Export at 24fps for that filmic motion
🚀 NEXT-LEVEL WORKFLOW HACKS
✔ Batch Editing → Edit one → Copy settings → Paste to 100 photos
✔ Cloud Syncing → Start on phone → Finish on desktop
✔ AI Auto-Tag → Let Lightroom organize your chaos
*”I edited 500 wedding photos in 2 hours using this” – @prophotog*
💎 WHEN TO GO PREMIUM (WORTH IT?)
✅ YES IF:
- You shoot RAW
- Need cloud storage
- Want desktop sync
- Crave ALL the tools
❌ NO IF:
- You just post for fun
- Only edit quick stories
- Happy with basic adjustments
*7-Day Free Trial = Just enough time to edit your whole feed*
🎯 FINAL BOSS CHALLENGE
- Take a MEH photo from your camera roll
- Apply 3 radical edits from this guide
- Post before/after with #LightroomGlowUp
Drop your @ below and we’ll feature the best transformations!
🔥 TL;DR MASTERCLASS:
- Steal these exact edit settings
- Make presets for your signature style
- Abuse the copy/paste function
- Flex on the gram with pro-level work